

 Click it and Unblock the Notifications

Latest Updates
-
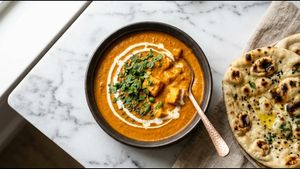 Restaurant Style Paneer Masala Recipe for a Perfect Dinner
 -
 Bagalamukhi Jayanti 2026 Date: When ‘Dhurandhar’ Fame Aditya Dhar Visited Bagalamukhi Temple With Yami Gautam
 -
 Ritesh Bawri’s Journey from 14 Near-Death Experiences to Reversing Chronic Illness
 -
 Who Is Sadhvi Satish Sail? The Journey From Goa To Miss India World 2026 Crown
 -
 Makeup Hacks 101: How to Keep Your Makeup Fresh in Summer Without Overdoing It
 -
 Maharashtra Restaurants Must Declare Fake Paneer From May 1: How To Spot Fake Vs Real Paneer
 -
 Asthma, Medication, and Weight: Why Anant Ambani May Not Be Losing Weight Easily
 -
 Celeb Beauty Routine: Inside Bigg Boss 17 Fame Soniya Bansal’s Everyday Skincare Ritual
 -
 Light Healthy Meal: The Ultimate Vegetable Soup Recipe
 -
 Throwback Thursday: Manoj Bajpayee Turns 57—When ‘Satya’ Gave Bollywood An Iconic Gangster, Bhiku Mhatre


Crispy South Indian Snack: The Ultimate Medu Vada Recipe
Achieving the perfect crunch on a Medu Vada is a common kitchen struggle for many home cooks. Many people find their vadas turn out too oily, flat, or dense inside rather than being light and airy. This Veg Medu Vada Recipe reveals the professional secrets used by top South Indian chefs for consistent results.
Most beginners assume the secret lies in the frying time or the oil temperature alone. However, the real magic happens during the grinding phase long before the batter even touches the hot oil. Understanding how to manage moisture levels will transform your cooking skills and impress your family with restaurant-quality snacks.

This classic South Indian delicacy is more than just a simple lentil donut. It represents a delicate balance of textures that requires patience and a specific technique to master. By following this guide, you will learn how to create that iconic crispy exterior and soft, cloud-like interior every single time.
Many traditional recipes often skip the small details that make a massive difference in the final outcome. We have tested various methods to find the one that works best for modern home kitchens using standard grinders. You no longer need to worry about the batter becoming too thin or the vadas losing their shape.
Why Everyone Is Talking About This Medu Vada Recipe Recipe
This specific version of the recipe has gained popularity because it focuses on the aeration of the batter. Most home cooks simply grind the lentils and start frying, which leads to heavy and dense results. Our technique involves whisking the batter to incorporate air, which creates a light and fluffy texture.
Another reason this recipe stands out is the precise water management during the grinding process. We teach you how to use ice-cold water in small increments to prevent the batter from heating up. Keeping the batter cool ensures that the proteins in the urad dal remain stable and hold air better.
Finally, the addition of specific aromatic spices like whole peppercorns and fresh curry leaves elevates the flavor profile. These ingredients provide a burst of freshness and a subtle heat that cuts through the richness of the fried snack. It is a true sensory experience that rivals any professional South Indian restaurant.
The science of fermentation also plays a minor role in the flavor development of this snack. While we do not ferment the batter for long, a short resting period allows the flavors to meld. This results in a more complex taste that balances the earthy notes of the white lentils perfectly.
Medu Vada Recipe Recipe at a Glance
| Feature | Details |
|---|---|
| Prep Time | 4 Hours (Soaking) |
| Cook Time | 20 Minutes |
| Total Time | 4 Hours 20 Minutes |
| Servings | 4 People |
| Difficulty | Medium |
| Cuisine Type | South Indian |
| Meal Type | Snacks |
| Calories (approx) | 280 kcal per serving |
The Cultural Significance of Medu Vada
Medu Vada is a staple in South Indian households and is often served during breakfast or as a festive treat. The word Medu literally means soft in Kannada and Tamil, referring to the tender interior of the snack. It is a symbol of hospitality and is almost always paired with sambar and coconut chutney.
In many regions, this snack is considered a mandatory part of a traditional wedding breakfast menu. It represents the skill of the cook, as making a perfectly round vada with a center hole is an art. Mastering this shape is often seen as a milestone for anyone learning the art of Indian vegetarian cooking.
Beyond its taste, the combination of lentils and spices makes it a protein-rich option for those on a plant-based diet. It provides sustained energy and is quite filling, making it an ideal snack for busy afternoons. The cultural roots of this dish run deep in the history of the southern peninsula.
Ingredients You'll Need for Medu Vada Recipe
The quality of your ingredients will directly impact the final taste and texture of your crispy vadas. Always ensure your urad dal is fresh and free from any moisture before you begin the soaking process. Using fresh aromatics like ginger and curry leaves will provide the best fragrance for your finished snack.
| Category | Ingredient Name | Quantity |
|---|---|---|
| Main Ingredients | Whole White Urad Dal | 1 Cup |
| Main Ingredients | Rice Flour | 2 Tablespoons |
| Main Ingredients | Refined Oil | For Deep Frying |
| For the Spice Mix | Green Chilies (Chopped) | 2 Pieces |
| For the Spice Mix | Ginger (Finely Minced) | 1 Inch Piece |
| For the Spice Mix | Black Peppercorns (Whole) | 1 Teaspoon |
| For the Spice Mix | Curry Leaves (Torn) | 10 Leaves |
| Optional Garnish | Fresh Coconut Bits | 1 Tablespoon |
| Optional Garnish | Fresh Coriander Leaves | 1 Tablespoon |
How to Make Medu Vada Recipe Step by Step
Prep Phase
- Wash the urad dal thoroughly in cold water at least three times. Soak the dal in plenty of water for four hours to ensure it softens completely for a smooth grind.
- Drain all the soaking water and transfer the lentils to a mixer jar. Use only one or two tablespoons of ice-cold water to grind the dal into a very thick paste.

Cooking Phase
- Transfer the ground paste to a large mixing bowl and add the rice flour. Whisk the batter vigorously in a clockwise direction for five minutes to incorporate air and make it light.
- Add the chopped green chilies, minced ginger, whole peppercorns, curry leaves, and salt to the batter. Mix gently with a spatula to distribute the spices evenly without losing the air bubbles.
- Heat the oil in a deep frying pan over medium heat until it reaches the right temperature. Test the oil by dropping a small piece of batter; it should rise to the surface immediately.
- Wet your palms with water and take a small portion of the batter in your hand. Form a ball and use your thumb to create a hole in the center before dropping it into oil.
Finishing Phase
- Fry the vadas on medium heat until they turn a deep golden brown color on both sides. Flip them occasionally to ensure even cooking and a consistent crispy texture across the entire surface.
- Remove the crispy vadas from the oil and place them on a paper towel to drain excess oil. Serve them immediately while they are hot and crunchy for the best eating experience.

Pro Tips for Veg Medu Vada Recipe Recipe
- Most common mistake: Adding too much water during grinding will make the batter thin and oily. Only add water in tiny splashes if the grinder stops moving during the process.
- Secret technique: Whisk the batter until a small drop of it floats in a bowl of water. If it sinks, you need to whisk more to add more air for fluffiness.
- Storage tip: You can store the ground batter in an airtight container in the fridge for one day. Do not add salt or onions until you are ready to fry the vadas.
- Variation suggestion: Add finely chopped onions or grated carrots to the batter for a different texture. This adds a nice crunch and sweetness to the traditional savory snack.
- Serving suggestion: Always serve these hot with a side of spicy ginger chutney or red chili sambar. The heat from the vadas pairs beautifully with the cool, refreshing taste of coconut.
Make This Medu Vada Recipe Tonight
Now that you know the secrets to the perfect crunch, it is time to get cooking. This recipe is sure to become a favorite in your household for weekend brunches or evening snacks. Your friends will be amazed at how you achieved such a professional texture at home.

Do not be afraid of the shaping process as it takes a little bit of practice to master. Even if your first few aren't perfect circles, they will still taste absolutely delicious and crispy. Save this recipe and share it with someone who needs it!


