




 Click it and Unblock the Notifications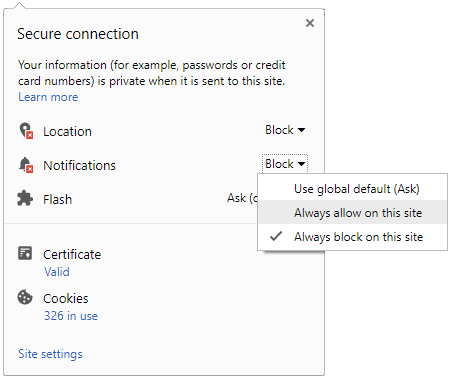


Latest Updates
-
 “Mere Karan Arjun Aa Gaye!” Says Vivek Dahiya After Divyanka Tripathi Gives Birth To Twin Baby Boys
 -
 Padma Awards 2026: Awardees Felicitated, Hema Malini Accepts Dharmendra’s Padma Vibhushan
 -
 4th Bada Mangal 2026: Spiritual Significance And Powerful Remedies To Do On This Purushottam Maas Tuesday
 -
 Restaurant Style Green Chutney Recipe for Breakfast
 -
 Padmini Ekadashi 2026: Date, Significance, Rituals, Traditions, And More
 -
 Horoscope for Today May 26, 2026 - Small Choices Build Steady Momentum
 -
 June 2026 Spiritual Calendar: From Parama Ekadashi To Vat Purnima, Key Dates To Mark This Month
 -
 Hotel Style Egg Rice Recipe: Your New Go-To Dinner
 -
 Pragya Gupta’s Success Story Proves One NEET Failure Isn’t The End Of The Road
 -
 More Women Are Getting Infections After Childbirth. Here's the Overlooked Reason Why


Authentic Rajasthani Dal Dhokli Recipe: A Flavorful Lunch

Dal Dhokli is a comforting one-pot meal from the heart of Rajasthan. Many home cooks struggle with the texture of the dough dumplings. They often turn out too hard or fall apart in the pot. This Authentic Rajasthani Dal Dhokli Recipe reveals the secret to perfect results. You will learn how to balance spices for a restaurant-style taste at home.
Making a delicious Veg meal does not have to be a complex task. This dish combines protein-rich lentils with healthy whole wheat dumplings. It is a complete meal that satisfies the whole family. Most people make the mistake of overcooking the lentils first. We will show you the right timing to keep the flavors fresh and vibrant.

The beauty of this dish lies in its simple pantry ingredients. You likely have everything you need in your kitchen right now. Rajasthani food is famous for using basic grains to create royal flavors. This recipe follows that tradition by using slow-cooking methods. The result is a thick, savory stew that warms your soul with every single bite.
Authentic Rajasthani Dal Dhokli Recipe relies on the quality of the dal used. We use split pigeon peas, also known as toor dal, for this version. This lentil provides a creamy base that coats the wheat pieces perfectly. The addition of peanuts adds a lovely crunch to the soft textures. You will love how the sweet and sour notes play on your tongue.
Why Everyone Is Talking About This Authentic Rajasthani Dal Dhokli Recipe
This specific version of the recipe has become a viral favorite for many reasons. Most recipes produce a very thin dal that lacks depth of flavor. Our method focuses on building layers of seasoning from the very start. We use a special blend of spices in the dough itself. This ensures that every bite of the dhokli is tasty and seasoned.
Texture is the most important part of a successful Rajasthani lunch dish. Many people find their dumplings become slimy after sitting for a few minutes. We use a hint of gram flour to prevent this common issue. The gram flour provides a nutty aroma and a firm structure. It makes the dish feel much more premium and professional in quality.
Another reason for its popularity is the health benefit of this Veg meal. It is packed with plant-based protein and high-fiber whole grains. There is very little oil used compared to other rich Indian curries. It is a guilt-free way to enjoy traditional flavors without feeling heavy. You can serve this for a weekday lunch or a weekend feast.
The secret technique involves simmering the dhoklis directly in the boiling dal. This allows the dough to soak up the spiced liquid like a sponge. It creates a cohesive flavor that you cannot get by cooking them separately. This one-pot method also means fewer dishes for you to wash later. It is a win for both the cook and the diners.
Authentic Rajasthani Dal Dhokli Recipe at a Glance
| Feature | Details |
|---|---|
| Prep Time | 20 Minutes |
| Cook Time | 40 Minutes |
| Total Time | 60 Minutes |
| Servings | 4 People |
| Difficulty | Medium |
| Cuisine Type | Rajasthani / Indian |
| Meal Type | Lunch / Dinner |
| Calories (approx) | 350 kcal |
The history of this dish is as rich as its flavor profile. It originated in the dry regions where vegetables were often scarce. Locals used lentils and flour to create hearty and filling meals. This resourcefulness led to one of the most iconic dishes in India. Today, it is enjoyed in homes and high-end restaurants alike across the globe.
Understanding the balance of spices is key to mastering Rajasthani cooking. We use dry ginger and carom seeds to help with digestion. These spices also add a sharp kick that cuts through the creamy lentils. The use of jaggery provides a subtle sweetness that balances the red chilies. It is a symphony of flavors that represents the desert culture perfectly.
Ingredients You'll Need for Authentic Rajasthani Dal Dhokli Recipe
Before you begin, ensure all your ingredients are fresh and measured correctly. Using high-quality toor dal will result in a much better texture. Freshly ground spices will also provide a stronger aroma during the tempering process. Make sure your whole wheat flour is fine and free of large bran particles. This helps in making smooth and soft dough pieces.
| Category | Ingredient Name | Quantity |
|---|---|---|
| Main Ingredients | Toor Dal (Split Pigeon Peas) | 1 Cup |
| Main Ingredients | Whole Wheat Flour | 1.5 Cups |
| Main Ingredients | Gram Flour (Besan) | 2 Tablespoons |
| Main Ingredients | Raw Peanuts | 2 Tablespoons |
| For the Spice Mix | Turmeric Powder | 1 Teaspoon |
| For the Spice Mix | Red Chili Powder | 1.5 Teaspoons |
| For the Spice Mix | Carom Seeds (Ajwain) | 1/2 Teaspoon |
| For the Spice Mix | Cumin Seeds | 1 Teaspoon |
| Optional Garnish | Fresh Coriander Leaves | 1/4 Cup |
| Optional Garnish | Desi Ghee | 1 Tablespoon |
| Optional Garnish | Lemon Juice | 1 Tablespoon |
You can adjust the spice levels according to your personal preference. Some people prefer a very spicy dal with extra green chilies. Others enjoy a milder version with more jaggery and tamarind. This recipe provides a balanced base that works for most palates. Feel free to experiment with the ratios once you master the basic steps.
How to Make Authentic Rajasthani Dal Dhokli Recipe Step by Step
Prep Phase
- Wash the toor dal thoroughly under cold running water several times. Soak it in two cups of warm water for thirty minutes before cooking.
- Mix the wheat flour, gram flour, and dry spices in a bowl. Add a little oil and knead into a firm, smooth dough with water.

Cooking Phase
- Pressure cook the soaked dal with turmeric, salt, and peanuts until soft. Whisk the cooked dal lightly to reach a smooth and pourable consistency.
- Roll out the dough into thin circles like a standard chapati. Cut the circles into small squares or diamond shapes using a sharp knife.
- Bring the dal to a boil in a large, heavy-bottomed pot. Add more water if the mixture looks too thick at this stage.
- Carefully drop the dough pieces into the boiling dal one by one. Stir gently to ensure the pieces do not stick to each other.
Finishing Phase
- Simmer the mixture on low heat for fifteen minutes until dhoklis cook. The dough pieces will float to the surface when they are ready.
- Prepare a tempering with ghee, cumin seeds, cloves, and dried red chilies. Pour this hot aromatic oil over the dal and cover the lid.

The final dish should have a medium-thick consistency that is easy to eat. If it becomes too dry, simply add a splash of boiling water. The dhoklis should be tender but still have a slight bite. This contrast between the creamy dal and chewy dough is very satisfying. Your kitchen will be filled with an incredible spicy aroma now.
The addition of lemon juice at the end is a vital step. It brightens the heavy flavors and adds a necessary tang. Always add the lemon juice after turning off the heat to preserve flavor. Garnish generously with fresh coriander for a pop of color and freshness. This dish is best served immediately while it is piping hot.
Pro Tips for Veg Authentic Rajasthani Dal Dhokli Recipe
To get the best results, you must pay attention to the dough consistency. If the dough is too soft, the dhoklis will dissolve in the dal. If it is too hard, they will feel like stones in your mouth. Aim for a texture similar to paratha dough for the best bite. Here are more tips to ensure your success today.
- Most common mistake: Adding dough pieces to cold dal will make them clump. Always wait for a rolling boil before adding the dhokli pieces.
- Secret technique: Add a teaspoon of oil to the boiling dal first. This prevents the dough pieces from sticking to the bottom of the pot.
- Storage tip: This dish thickens significantly as it cools down over time. Reheat with a little extra water and salt to restore the texture.
- Variation suggestion: You can add vegetables like carrots or peas for extra nutrition. This makes the dish even more colorful and filling for kids.
- Serving suggestion: Serve with a side of raw onions and crispy papad. A dollop of garlic chutney also pairs beautifully with this meal.
Following these tips will make you look like a pro in the kitchen. Many people find this dish intimidating, but it is actually very simple. The key is patience during the simmering stage of the cooking process. Do not rush the dhoklis or they will stay raw in the middle. Enjoy the process of creating this traditional masterpiece today.
Make This Authentic Rajasthani Dal Dhokli Recipe Tonight
Now you have all the tools to create a stunning Rajasthani lunch. This recipe is a great way to bring traditional Indian flavors home. It is healthy, delicious, and very easy on the monthly grocery budget. Your family will appreciate the effort and the deep, complex flavors of this dish.

There is something very special about sharing a one-pot meal with loved ones. It encourages conversation and a sense of warmth at the dining table. This Veg delicacy is sure to become a regular in your household menu. Save this recipe and share it with someone who needs it!

 Continue with Google