

 Click it and Unblock the Notifications

Latest Updates
-
 National Technology Day 2026: How Pokhran-II Nuclear Tests Shaped India’s Identity In STEM
 -
 Horoscope for Today May 11, 2026 - Small Choices, Big Progress
 -
 Mor Kuzhambu Recipe: Your Guide to South Indian Yogurt Curry
 -
 Priyanka Chopra Receives Global Vanguard Honour At Gold Gala 2026 In Couture From 20-Year-Old Chikankari Saree
 -
 Thekua Recipe: Your Guide to this Traditional Sweet Snack
 -
 Thalapathy Vijay Sworn In As Tamil Nadu CM, Issues First Executive Orders: Women’s Safety Task Force Explained
 -
 Sonam Kapoor Reveals Newborn Son’s Name Which Has A Connection To Vedic Symbolism
 -
 Self-Care Isn’t Selfish: When Mothers Prioritize Everyone’s Health Except Themselves
 -
 Aloo Methi Recipe: Your Go-To Simple Dry Sabzi
 -
 Mother’s Day 2026: Stylish Mother-Daughter Twinning Ideas That Will Make Every Family Photo Look Beautiful


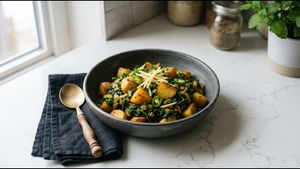
Thalipeeth Recipe: Your Healthy Multigrain Dish
Making a perfect Thalipeeth can be a real challenge for many home cooks. You might find your dough breaking or sticking to the pan too often. This Thalipeeth Recipe Healthy version solves these common kitchen problems with ease. It provides a foolproof method for a nutritious and delicious breakfast.
Many people make the mistake of using too much water in the dough. This turns the mixture into a sticky mess that is hard to handle. Our secret technique ensures a perfect texture every single time you cook. You will learn how to balance the flours for the best results.

This traditional flatbread comes from the heart of Maharashtra in India. It is a protein-packed meal that keeps you full for many hours. The dish is naturally veg and fits well into any healthy diet plan. Using a variety of grains makes it very high in fiber.
You do not need to buy expensive pre-made flour mixes for this. Most of these ingredients are already sitting in your kitchen pantry right now. We will show you how to mix them to create the perfect flavor. Your family will love the nutty taste and the crispy edges.
The Thalipeeth Recipe Healthy style is all about the right grain ratio. We use jowar, bajra, and besan to create a complex flavor profile. These grains provide essential minerals like iron and magnesium for your body. This makes it a great choice for growing children and active adults.
Many people struggle with the flatbread cracking while they are patting it down. This usually happens when the dough is too dry or lacks binding. Adding a small amount of whole wheat flour helps to hold everything together. This ensures your thalipeeth stays intact from the board to the pan.
Why Everyone Is Talking About This Thalipeeth Recipe
This specific version of the recipe is gaining popularity for its unique texture. Most traditional recipes can be quite heavy or oily for modern tastes. Our method focuses on a light and crispy finish without using excess fat. It is the perfect balance of health and traditional taste.
The secret lies in the addition of fresh vegetables like grated cucumber or onions. These vegetables release moisture as the dough sits for a few minutes. This natural moisture makes the flatbread incredibly soft on the inside. Meanwhile, the multigrain flours provide a delightful crunch on the outside.
Another reason this recipe works is the specific spice blend we use. We toast the cumin and carom seeds to release their aromatic oils. This simple step transforms the dish from basic to restaurant-quality at home. It creates an aroma that will fill your entire kitchen instantly.
The technique of patting the dough on a damp cloth is essential. It allows you to make very thin flatbreads without them sticking. Most beginners try to roll the dough with a pin and fail. This manual patting method gives you total control over the thickness.
Thalipeeth Recipe at a Glance
| Category | Details |
|---|---|
| Prep Time | 15 Minutes |
| Cook Time | 20 Minutes |
| Total Time | 35 Minutes |
| Servings | 4 People |
| Difficulty | Medium |
| Cuisine Type | Indian (Maharashtrian) |
| Meal Type | Breakfast |
| Calories (approx) | 185 kcal per serving |
Ingredients You'll Need for Thalipeeth
Gathering all your ingredients before you start is the key to success. This recipe uses a mix of flours and fresh aromatic herbs for flavor. Make sure your vegetables are finely chopped so they blend into the dough. This helps in achieving a smooth and even shape later.
| Group | Ingredient | Quantity |
|---|---|---|
| Main Ingredients | Jowar (Sorghum) Flour | 1 Cup |
| Main Ingredients | Bajra (Pearl Millet) Flour | 1/2 Cup |
| Main Ingredients | Besan (Gram Flour) | 1/4 Cup |
| Main Ingredients | Whole Wheat Flour | 1/4 Cup |
| Main Ingredients | Finely Chopped Onion | 1 Medium |
| Spice Mix | Green Chili Paste | 1 Teaspoon |
| Spice Mix | Cumin Seeds | 1 Teaspoon |
| Spice Mix | Carom Seeds (Ajwain) | 1/2 Teaspoon |
| Spice Mix | Turmeric Powder | 1/2 Teaspoon |
| Spice Mix | Salt | To Taste |
| Optional Garnish | Fresh Coriander Leaves | 2 Tablespoons |
| Optional Garnish | White Butter (Loni) | For Serving |
How to Make Thalipeeth Step by Step
Prep Phase
- Take a large mixing bowl and add all four types of flour. Use a whisk to combine the jowar, bajra, besan, and wheat flour evenly. This ensures there are no large lumps in your final dough mixture.
- Add the chopped onions, green chili paste, and all the dry spices. Mix these into the flour using your hands to coat the vegetables. The salt will start to draw out moisture from the fresh onions.

Cooking Phase
- Slowly add warm water to the bowl while mixing with your fingers. Knead the mixture into a soft and pliable dough that is not sticky. Let the dough rest for five minutes to allow the grains to hydrate.
- Place a clean damp cotton cloth on a flat kitchen surface or board. Take a lemon-sized portion of the dough and place it in the center. Wet your fingers and gently pat the dough into a thin circle.
- Make three or four small holes in the disc using your index finger. These holes allow the steam to escape and help the flatbread cook evenly. Carefully lift the cloth and flip the thalipeeth onto a hot greased pan.
- Drizzle a few drops of oil or ghee into each of the holes. Cover the pan with a lid and cook on medium heat for two minutes. The steam will help cook the multigrain flours through to the center.
Finishing Phase
- Remove the lid and flip the flatbread once the bottom is golden brown. Cook the other side without a lid until it becomes crisp and dark. Press down gently with a spatula to ensure the edges are fully cooked.
- Remove the hot thalipeeth from the pan and place it on a plate. Serve it immediately with a dollop of fresh white butter or thick curd. The contrast of hot bread and cold butter is truly wonderful.

Pro Tips for Veg Thalipeeth Recipe
- Most common mistake: Adding too much water at once makes the dough impossible to shape. Always add water in small splashes to maintain the right consistency.
- Secret technique: Use a damp cotton cloth instead of plastic for patting the dough. The moisture in the cloth prevents the grains from drying out too quickly.
- Storage tip: You can store the dry flour mix in a jar for months. Just add the fresh ingredients and water when you are ready to eat.
- Variation suggestion: Add grated carrots or bottle gourd to make the dish even more nutritious. This adds a natural sweetness and extra fiber to your breakfast.
- Serving suggestion: Pair this dish with spicy garlic chutney or a dry peanut thecha. These bold flavors complement the earthy taste of the multigrain flours perfectly.
Make This Thalipeeth Recipe Tonight
This healthy breakfast is a great way to start your day with energy. It combines ancient grains with fresh vegetables for a complete and balanced meal. You will love how easy it is to make once you practice. Your body will thank you for choosing such a nutritious and veg option.
The smoky flavor from the cast iron pan makes it taste like a restaurant. Do not be afraid to experiment with different seasonal vegetables in the dough. Each variation brings a new and exciting taste to your dining table. This dish is perfect for breakfast, lunch, or even a light dinner.

Save this recipe and share it with someone who needs it!